
Multiplayer
by Anthony Cagliano
User's Guide
&
Documentation
Dedication
This program is dedicated to the entire calculator programming community whom, through the years, have provided much assistance, encouragement, and suggestions, and without whom I doubt this project would have made it this far. Thank you!
Installation
Welcome to the official user’s guide for Star Trek Multiplayer for the Texas Instruments TI-84+ CE graphing calculator. First and foremost, allow me to thank you for your interest in this project and I hope you enjoy playing it as much as I enjoyed making it (well, most of the time).
To install this game, you must send the program STARTREK.8xp to your TI-84+ CE using your linking software and a USB A to mini B cable. You must send this program into your RAM in order to run it, unless you use a 3rd party shell such as Cesium or DoorsCE. If you are using any alpha version of this program, you will also need to send the enclosed application variables to your calculator: TrekTech.8xv, TrekImg.8xv, TrekShip.8xv. These files contain (1) Statistics about weapons, (2) Sprites for map objects, weapons, and visual effects (like shield flare and explosions), and (3) Default ship configurations, respectively.
You will also need to download and install the C libraries by MateoConLechuga. They can be found at https://github.com/CE-Programming/libraries/releases. You will need to send libload.8xv, fileioc.8xv, graphx.8xv, and keypadc.8xv to your calculator. These application variables are helper libraries that provide functions that this game uses. Please note that this game will NOT function without them.
Usage
The program is fairly complicated due to its intricate nature. There are a variety of key combinations, menus, hotkey functions, and graphical interfaces to navigate. I did my best to select keys that are most relevant to specific functions, and use the same key to perform a different function depending on what GUI you have active.
First let’s explore all ship systems that are available to you, and ever will be available. It will be important to the rest of this guide, and to gameplay in general to understand how everything in this game works. To that end, let's begin!
Ship Systems and Functions
Every system on a ship in this game is designed as a customizable module that performs a specific function, based on its tech type, and deriving data based on its tech ID. The tech type of a module, besides indicating what a module does on your ship, helps to ensure that future upgrades to your ship's systems are saved into compatible tech slots. The tech ID is used to reference a database wherein information pertinent to that tech type is stored, allowing a simple copy of information from the reference to your module. In this section we will explore the module (or tech) types that are available to players, and whether they are starting (or default) modules, or extras that can be installed later! If you are familiar with Star Trek in general, you can probably infer what most of this stuff does and skip directly to the Combat system explanation, or to Key Bindings.
Shield Modules (Default)
Shield modules in this game do exactly what you think they would... they negate a certain amount of incoming weapons damage to your ship, in exchange for a reduction in overall shield health. Shields are perhaps your most important tactical module, as a sufficiently powerful and healthy shield can absorb most if not all damage a ship would take well into a battle. The only drawback to the shield system is that it constantly drains power while online, but for the benefit you get, this is well worth the cost.
Every shield module has an upper deflection threshold that controls how much incoming damage the shield is capable of deflecting at 100% power. Every statistic you see for modules is based on 100% power usage. If a weapon's payload is less than the shield's deflection threshold, the weapon is completely blocked by the shield. If the payload is above the deflection threshold, the shield absorbs as much as it can and any remaining damage is bleedthrough. Shield module upgrades will eventually be purchaseable, in-game, to enhance certain characteristics about the shield module, such as amount of health the shields have, the deflection threshold, the power usage, and more. Later shield modules will even have independent sections with independent power and health settings, allowing you to focus shield power in certain areas.
Hull Integrity (Default)
The hull integrity module is a silent system that exists and always consumes power, like your shields. In some regards it is a second, less effective shield. Essentially, this module IS the hull of your ship. The hulls of many starships were polarized to help them resist damage, and had significant thickness to tank damaging weapons fire without severe internal damage.
In much the same way, the hull integrity module in the game has the same function. Like the shields, your hull has a damage mitigation threshold, which is how much damage the hull can absorb. This value is usually much lower than it's shield counterpart (the deflection of a hull is much less than that of a shield). While your hull integrity module remains healthy, it will continue to afford your ship's systems some protection against damage. Once the health of this module drops below 25%, the effective damage mitigation is halved. This means more damage will make it through a damaged hull. Finally, once the module's health hits 0%, the module stops protecting your ship.
While hull integrity is significantly less effective at protection than your shields, when you are in battle against equal or even stronger opponents, devoting some resources, time, and even power to the strength of your hull can mean the difference between destruction and living to fight another day. Upgrades to this module can increase its health and its damage mitigation.
Life Support (Default)
While this system is not specifically a combat system, it is perhaps one of the two most important systems on your ship and is incredibly important to defend. Life support is exactly what it sounds like... it makes a starship floating in the inhospitable, freezing, oxygenless vacuum of space habitable for you and your crew. As such, it is impossible to alter the power usage of this system. If this system is reduced to 0% health during combat, you have 2000 in game ticks to repair and reactivate it before you lose the game. Upgrades to this system can increase its health and power efficiency.
Propulsion -- Warp Drive & Impulse Drive (Default)
These two systems comprise your ship's ability to move. The impulse drive is your sub-light engine (engine that enables slower-than-light travel). Impulse speeds range anywhere from 1 field per tick to 5 fields per tick (although the upper speed limit for most impulse drives in the game is 4 fields). Most ship v ship combat will occur at impulse speed and as such, your ability to maneuver will lend to your ability to dodge incoming weapons fire, escape enemy targeting range, and even position your ship so as to target vital systems of an enemy ship.
The warp drive, on the other hand, is the FTL engine. In Star Trek, it is achieved by warping space around your ship. In game, you just move really fast. The slowest warp speed is Warp 1, which starts at 10 fields per tick. Each subsequent warp "factor" increases your speed by the factor number. So Warp 2 is an increase of 2 fields per tick from Warp 1, Warp 3 is an increase of 3 fields per tick from Warp 2, and so on. This engine will enable you to travel around the map far faster than you would at impulse, allowing you to rescue your friends and allies, escape a battle you are losing, and more.
Upgrades to either engine can increase their health, their maximum speed, and their power efficiency.
Phasers & Torpedoes (Default)
If your shields and hull integrity would be your ship's defensive systems, these are your offensive systems. They comprise your energy and projectile weapon systems, respectively.
Phasers are bursts or beams of energy that are emitted from your ship. They are specifically strong against shields but do much less damage to your hull and ship. Phasers may be fired in quick bursts or charged to deal a large amount of damage. They also cost a ton of power to fire, especially when charged. Phasers will always fire in a straight line, in the direction they are aimed, at 10 fields per tick. They do not curve to follow their targets. Upgrades to your phaser module can increase its health, damage dealt, and power efficiency.
Torpedoes are projectile weapons that are fired either in front of or behind your ship. They barely effect shields but usually can do significant hull damage. Torpedoes cannot be charged like phasers can, but a torpedo module can equip any type of torpedo you have in your inventory. Torpedoes deal varying damage, move at varying sub-light speeds, and have cooldowns on firing them. Torpedoes will track any object they are locked onto, or will track the closest object to them that is not your ship if not locked onto something. Upgrades to your torpedo module increase its health, projectile firing speed, and decrease the cooldown.
Sensors -- Targeting & Navigation (Default)
Your sensor system is what shows you ships and environment, as well as potential hazards, in your vincinity. Every sensor module has a maximum range, which is a radius around your ship, within which anything that is there will be detected. The current orientation of your ship becomes the flat axis, relative to which the 3D map is projected onto a 2D display. Objects that can damage your ship will be shown in red, other vessels will be shown in green for allied and blue for non-ally. Weapons fire will not be shown on that screen.
Your sensor system also integrates with your weapons systems and your transporter system (coming next), allowing you to navigate a targeting GUI that is superimposed onto the sensor display, and use hotkeys to lock on to a target with the transporter or weapons. As long as the sensors are above 25% health, they will be able to automatically target the object nearest to the targeting GUI.
The sensor system can also render a consolidated version of this onto the Viewscreen if the sensor system is above 25% health. The two display modes are Navigational and Tactical. In navigational mode, the ship's coordinates and orientation are superimposed onto the rendered viewscreen GUI. In tactical mode, a targeting GUI is superimposed onto the viewscreen.
Upgrades to your sensor system increase its health, the maximum range at which sensors will detect objects, and the speed at which your sensors work.
Transporters (Default)
The transporter system is what allows you to move materials or people from outside your ship inside, or vice versa. Using this system you can beam intruders onto enemy ships to do damage, beam intruders off of your ship, or beam materials such as resources or loot into your inventory. It functions via the sensor display, where you can activate the transporter locking GUI by holding down the transporter key, move around to an object you want to beam, and then release the transport key to initiate the transport. Energy will be drained from your ship. Maximum transporter range is half of your sensor range.
Upgrades to your transporters increase its health and the efficiency of energy use.
Warp Core (Default)
The warp core is the most important non-combat system on your ship. It is the generator of all power for your ship, and damage to this module decreases the maximum power output of your ship and the power each module replenishes every tick. Additionally critical damage (below 25% health) to this module can cause a warp core breach that can destroy your entire ship. Obviously, protecting this module is of the utmost importance.
The warp core generates power at a rate specified in its stats. It also gives itself one (1) power unit regardless of its current state and health every 20 ticks. This power production steps down in 25% intervals, meaning the Core will produce 100% power until it hits 74% health, then it will reduce its power output to 75%. When the Core reaches 49% health, it will reduce its power output to 50%. This is the point at which your ship's systems will begin to draw 20% less power, to attempt to distribute power loss evenly. Once the warp core reaches 24% health, the power output steps down to 25%. The core then runs the risk of a Warp Core breach occuring. The odds of a breach starting are described by the formula probability = (health * 10) ^ -1, or probability = 1 / (health * 10). When a breach triggers, a timer will begin that lasts 1000 game ticks. In that time, you must either repair the warp core to above 50% health, or eject the warp core. An ejected warp core is placed behind your ship and continues to count down from the time at which it is ejected, and then explodes in the second most powerful explosion in the game. If you do not succeed in moving your ship a safe distance away, it will be significantly damaged.
One of the downsides to ejecting your warp core is that it immediately ceases producing power. All of your ship modules will quickly lose power and go offline, resulting in an inevitable total shutdown of your ship, and eventual life support failure. This means that you really only want to eject a warp core if: (1) You have help nearby, (2) You are near a friendly starbase that you can get to before losing power, since proximity to a friendly starbase provides a repair bonus, (3) You have a backup warp core module in your inventory that you can swap in after ejecting the old one, or (4) You have an auxiliary power reserve module, that will continue to supply your ship for a good amount of time. Bear in mind that even reserve power will eventually run out.
Cloaking Module (Non-Default)
The cloaking module is a non-default module that you can install onto a miscellaneous tech module. The cloaking module has an effective range and a ship equipped with it is rendered invisible and undetectable to any vessel OUTSIDE that range. If you come within that range, you become able to detect and target (but still not see) that ship. A cloaked ship cannot be seen, picked up on sensors, or targeted by any ship that is outside the cloak's effective range.
Upgrades to the cloaking module decrease its effective range, allowing you to get closer to enemy ships without being detected. Upgrades similarly increase the health of the module, or can improve its power efficiency.
Auto-Repair Module (Non-Default)
By default, you can use the Status screen to select a module for repair and press the [Mode] key to stop and start the repair. This repair feature is manual, and uses a significant amount of power from that module's reserve power to repair itself. It also forces the module to be switched offline to repair.
Auto-Repair is an add-on module that helps your ship repair itself a bit more efficiently, especially mid-battle, when it may not be the best decision to bring a system offline. Bringing auto-repair online starts draining a significant portion of your ship's power, and begins to add 1 unit of health to every system every 20 ticks (as often as the warp core is given power).
Work in Progress
Interfaces and Menus
Now let's review the menus/interfaces that are available to players within the game. I will break down the hotkeys that are active within each particular interface. The most obvious ones are the LCARS interfaces, accessible by using the top row of keys on your device. From left to right, these are: Tactical Report, Status Report, Sensors, Power Allocation, and Chat.Tactical Report:
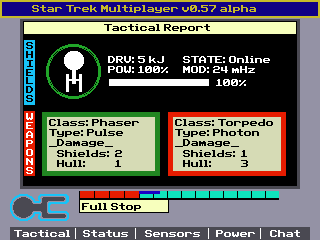
This screen presents detailed information about your combat-specific systems. This includes your shields and your weapon systems (phasers/torpedoes). On the top half of the screen you will be shown the overall status of your shields, their maximum damage resistance, and their current overall power status. If you have a grid-type shield (with forward, aft, starboard, and port sections), you will be able to alter the power configuration of sections of your shields independently via this panel. On the bottom half of the screen you will see the status of your weapons systems. Here, you will be able to arm a module for firing (you have to select either phasers or torpedoes). You will also be able to see their base shield and hull damage.
Status Report:
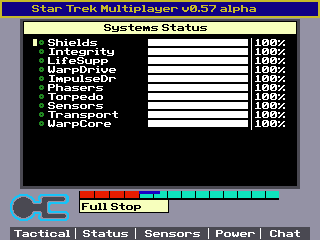
This screen presents information about the health of your ship systems. Your shields and hull integrity are always listed first. The main purpose of this screen is to view system status, but it also has two other functions. If a system is damaged to a point where it no longer works, or a critical alert has been triggered, such as a warp core breach in progress or a life support failure, you can use this menu to repair that system. Finally, in this menu, if your warp core is breaching and you do not have the time to repair it, you may simply eject it. See Combat Mechanics for more details.
Sensor Readings:
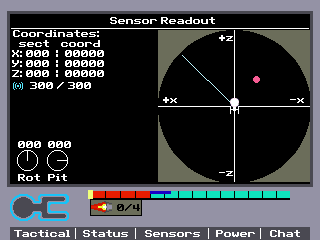
This screen presents information about the area around you. Every object within your sensor radius is mapped to 2D coordinates and projected onto the screen. This allows you to see the relative distances of objects from your ship. The 2D map will always treat your ship’s orientation as being flat on the 2D plane, so that ships that are in front of, behind, or to the side of you will show being at a distance, but ships on top of or below you will show as being on top of you.
Power Allocation:
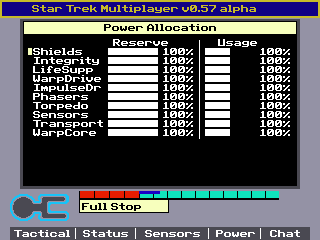
This screen presents information about the power configuration of your ship. This screen, at first glance, may appear a bit cluttered, but is quite simple. System names are on the far left. The first bar, closest to the name, is the system reserve power. This is the amount of power that a system has to use before it fails. Under normal conditions, the ship’s warp core OR auxiliary power bank supplies more than enough power to keep all ship systems powered. As the core takes damage, however, it’s power output decreases, causing systems to begin using up power faster than they can replace it. You may then activate a reserve power module, if you have one installed, which will ensure your systems remain powered until that runs out of energy. It may, during battle, become necessary to reduce the power that non-combat systems use, and/or increase the power your shields and weapons use. This is what the second bar (far right) indicates. Each system starts out using 100% power, meaning it is using exactly what it is absorbing. You may use the Arrow keys to alter how much power a system uses, relative to what it receives. **You may not alter the power usage of the Warp Core or the Life Support system. **
Chat/IRC:
This screen lets you interact with other players. Type messages using the keyboard (in automatic alpha lock), and press [Enter] to send. You will also be able to view messages sent by other players on this screen. Here you will also see join and leave messages for players who log onto or off of the server.
Viewscreen:
The viewscreen is a rendered projection of the 3D space in front of your ship that is within render distance and a field of vision. The visible angle is 45˚ from the direction your ship is facing to either side as well as up and down. Through this screen you can see other ships flying around, the environment of space in front of you, weapons fire, planets, stars, and much more.
The viewscreen also serves as a simpler targeting scanner as well, however its effectiveness is limited to objects within your field of vision, whereas the Sensors tab can target an object within sensor range, whether in your field of view or not. Press and hold the [Alpha] key to engage the weapons lock, and then use the arrow keys to move the crosshairs around on the screen. Your weapons will fire in the direction you are aiming.
It is not possible to use the viewscreen to target something with your transporters. This must be done via the Sensors tab, as transporter control is a bit too intricate to handle through the viewscreen.
Combat Mechanics
Combat in this game is complicated, and fast paced, just like combat in Star Trek is. You will need to respond to a variety of attacks in real time, be it through maneuvering your ship out of danger, utilizing your defensive systems, or attacking back. In this game, you are the captain and your calculator’s buttons/screen are your LCARS system. The longer it takes you to issue an order (through interacting with your calculator), the more chance your ship will be damaged in battle.
Basic Combat Calculations
Every weapon you shoot has two damage values, shield damage and hull damage. These values are listed on the Tactical LCARS screen. Shield damage is the amount of damage the weapon will deal to a shield module that is blocking it (an offline shield module takes no damage, but affords no protection). Hull damage is the amount of damage the weapon will deal to your ship and/or internal systems. The formulas used to describe damage are as follows:
incoming_shield_damage = weapon_shield_damage
incoming_hull_damage = weapon_hull_damage
shield_converted_damage_resistance =
shield_damage_resistance *
[shield_health / shield_maxHealth] *
[shield_powerUsage / shield_powerDraw]
incoming_hull_damage -= shield_converted_damage_resistance
shield_health -= incoming_shield_damage
hull_converted_damage_resistance =
(hull_health_percent >= 25) ? hull_damage_resistance
: (hull_health_percent > 0) ? hull_damage_resistance >> 1
: 0
hull_health -= incoming_hull_damage
incoming_hull_damage -= hull_converted_damage_resistance
Any damage remaining at this point is dealt to internal systems, currently selected randomly
Most modules that are damaged will continue to perform their tasks normally until they recieve critical damage (enough damage to bring the module's health below 25%). Some will even continue working until they hit 0%, for others their effectiveness is based on their percentile health, or stepped-down based on it. Similarly, most modules are also affected by their power configuration. Modules that are boosted (more on that next) perform their tasks more efficiently, modules that operate on reduced power perform their tasks less efficiently, modules that are offline do not work at all. Any module, except for shields and hull integrity, that hits 0% health or runs out of system reserve power is set offline automatically.
Boosting / Reducing Modules
With the exception of the warp core and the life support system, you can alter the power configuration of various systems to alter the efficiency with which they perform their tasks. Boosting a module means increasing its power usage to higher than its power draw. Modules may be boosted to a maximum of 200% power, which causes them to use power at twice the rate they are receiving it and perform their tasks twice as effectively. Modules may be reduced to a minimum of 20% power, which causes them to use power 5x less than they are receiving it, and perform their tasks at 20% efficiency. Below is a list of all modules and the effects of boosting/reducing on that module type:
Shields
Boosted: Increase maximum damage resistance
Reduced: Decrease maximum damage resistance
Hull Integrity
Boosted: Increase maximum damage resistance
Reduced: Decrease maximum damage resistance
Life Support
Cannot be altered
Warp Drive
Boosted: Increases maximum warp speed (+5 maximum)
Reduced: Decreases maximum warp speed (10 minimum)
Impulse Drive
Boosted: Increases maximum sub-light speed (+2 maximum)
Reduced: Decreases maximum sub-light speed (2 minimum)
Phasers
Boosted: Increases maximum phaser yield (damage)
Reduced: Decreases maximum phaser yield
Torpedoes
Boosted: Decreases firing cooldown
Reduced: Increases firing cooldown
Sensors
Boosted: Increases effective sensor range and speed
Reduced: Decreases effective sensor range and speed
Transporters
Boosted: Increases effective transporter range
Reduced: Decreases effective transporter range
Warp Core
Cannot be altered
Cloaking Device
Boosted: Decreases effective cloaking range (you can get closer without being seen)
Reduced: Increases cloaking range (you will be seen further away)
Auto-Repair
Boosted: Increases auto-repair amount (to a maximum of 2 health units per 20 ticks)
Reduced: Decreases auto-repair amount to 0.
* Due to the potential for this system to become OP, it is limited to 0, 1, or 2.
Your Crew
To add some realism to the game, and provide another loss condition, your ship has a crew size. You will start with anywhere from 1500 to 2500 crew members, depending on the type of ship you have. Doing some actions in the game will cost you crew members. For example, you can beam members of your crew to an enemy ship to try to sabotage its systems. They will continue to do damage to that ship at an interval, and stand a chance of being "captured" aboard the enemy ship. In addition, any damage your ship takes causes you to lose crew members. You will lose more crew members from more damage. The source of the damage does not matter. You will lose crew whether you are hit by a torpedo, fly into an asteroid field, are caught in the damage radius of a star or warp core breach... anything that can damage your ship will cost you crew members.
Win & Lose Conditions
Win and Loss in the Demo will be very different than in the full-feature game. If you are using a demo version of the game, you are most likely in singleplayer mode and you have a single objective to complete. These objectives will entail engaging in battles with ships from the newer Star Trek movies. The demos serve to showcase some of the features of the game, and serve as combo tests.
In the full feature game, a Game Over occurs when your ship is destroyed in combat by another player or the terrain, or all of your crew dies. For the first condition, a Warp Core breach is the only current way in which to have your ship destroyed. There are, however, several ways in which to have your crew all killed. These are detailed in the section about your crew. Losing all the crew on your ship causes the ship to become abandoned. When any Game Over occurs, you will lose the ship you are currently using and you will have to start over with a new ship, or another ship you own.
Key Bindings
| GLOBAL (these work in any menu) |
|---|
| Key | Screen Mode | Function |
|---|---|---|
| [Y=] | N/A | Open/close tactical report |
| [Window] | N/A | Open/close system status report |
| [Zoom] | N/A | Open/close sensor display (not implemented) |
| [Trace] | N/A | Open/close power allocation settings |
| [Graph] | N/A | Uncertain |
| [Clear] | N/A | Instantly exit the game |
| [2nd] | N/A | Fire Phasers |
| DEFAULT (VIEWSCREEN) |
|---|
| Key | Screen Mode | Function |
|---|---|---|
| [Alpha] | All | Cycle installed weapons modules |
| [Mode] | Navigational | Engage targeting mode |
| [Mode] | Targeting | Disengage targeting mode |
| Keypad | Navigational | Change ship rotation and pitch |
| Keypad | Targeting | Aim weapons |
| Tactical Report |
|---|
| Key | Screen Mode | Function |
|---|---|---|
| [Alpha] | N/A | Cycle installed weapons modules |
| [Mode] | N/A | Toggle shields online/offline |
| [X,T,n,ø] | N/A | Remodulate shields |
| Systems Status |
|---|
| Key | Screen Mode | Function |
|---|---|---|
| [Enter] | N/A | Activate manual system repair on selected |
| [Mode] | N/A | Toggle selected module online/offline |
| Keypad [Up/Down] | N/A | Scroll module selector |
| [Del] | N/A | **conditional** if warp core breaching Eject warp core |
| Sensor Display |
|---|
| Key | Screen Mode | Function |
|---|---|---|
| Unimplemented |
| Power Allocation |
|---|
| Key | Screen Mode | Function |
|---|---|---|
| [Enter] | N/A | Toggle selected module online/offline |
| [Mode] | N/A | Swap between main and auxiliary power |
| Keypad [Up/Down] | N/A | Scroll module selector |
| Keypad [Left/Right] | N/A | Increase/decrease power use of selected system |